 |
Forum Oficjalnego Klubu Mitsubishi - MitsuManiaki
|
|
| Ogłoszenie |

W myśl ustawy RODO, akceptując regulamin wyrażasz zgodę na gromadzenie i przetwarzanie swoich danych osobowych w celach związanych z przyznaniem dostępu do forum / wstąpieniem do klubu.
Administratorem danych jest Oficjalny Klub Mitsubishi - MitsuManiaki
Jeśli nie akceptujesz powyższych informacji, prosimy o kontakt z Administracją w celu usunięcia konta.
|
Przesunięty przez: Bzyk_R1
15-08-2022, 20:44 |
How to install an EVO MOMO steering wheel in Outlander 1 |
| Autor |
Wiadomość |
best_x_treme 
Forumowicz
best_x_treme
Auto: O1T
Kraj/Country: Polska
Dołączył: 22 Kwi 2021
Posty: 64
Skąd: Piatra Neamt / Romania
|
 Wysłany: 31-07-2022, 12:08 How to install an EVO MOMO steering wheel in Outlander 1 Wysłany: 31-07-2022, 12:08 How to install an EVO MOMO steering wheel in Outlander 1
|

|
|
I remember, before buying my O1T, that I’ve seen pics with MOMO steering wheel in O1T. I was impressed with the look and keep that in mind for future plans with my car. Then I’ve read here on other topics that to install MOMO you have to cut your steering wheel support and weld it to MOMO, as to fit the O1T steering column. This approach is complicated, so I’ve decided not to go this route and give up this cool steering wheel. But later I’ve found new information, that you can swap your column with an early 2003 pre-facelift Outlander and happily install MOMO. This look like something I could do. So, I’ve bought the steering wheel and a steering column from a 2003 Outlander (not turbo) and went to install them. I’ve managed to install the new column, but unfortunately this will not fit perfectly, basically there is no space to tilt up and down. So, I knew at this point that the only way to install it would be to swap the inner shafts of the 2 columns, to keep my column but with the pre-facelift shaft.
Some used a shaft from Lancer, but this will be slightly shorter. The shaft from Outlander pre-facelift is perfect in lenght. In this pics from left to right, Outlander prefacelift column, Outlander facelift column and a inner shaft from Lancer.
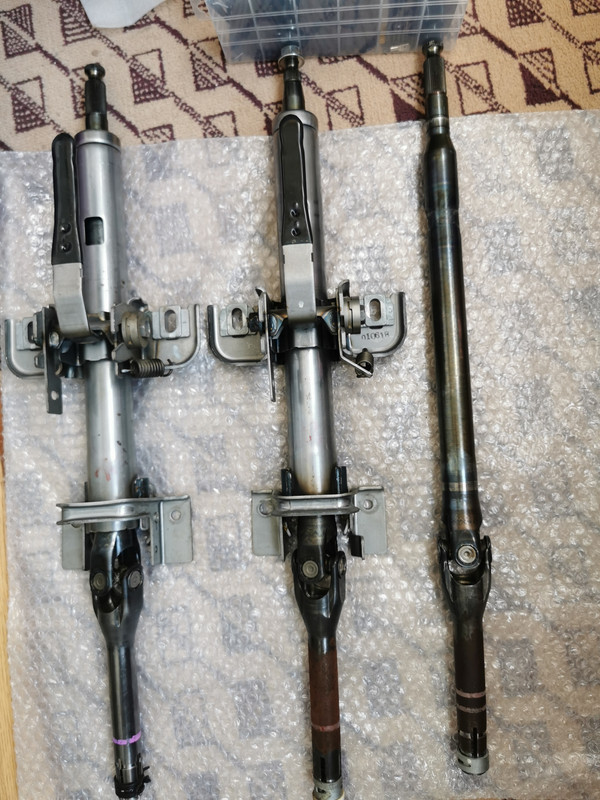
you can see in this photo how the whole column from pre-facelift is different

If you install this in a Lancer, you can use the whole column, as is identical between pre-facelift and facelift.
I will describe more detailed how to deal with the inner shaft, the other steps are relatively easily to follow.
- disconnect battery
- remove airbag and steering wheel

- disconnect the panels under steering wheel

- remove airbag SRS clock spring and headlight switch and wipers. Make sure you don’t rotate the airbag clock spring!
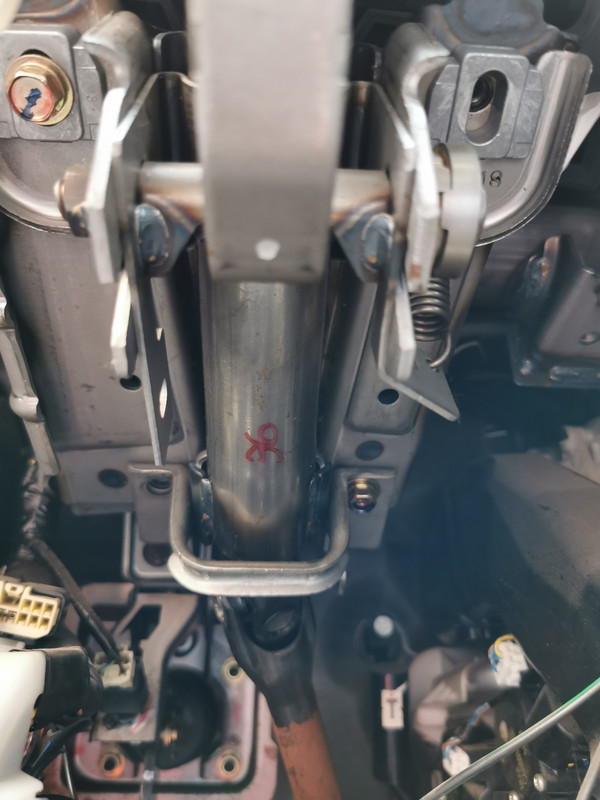
- remove the 4 bolts that keep the steering column and remove the column by pinch the steering column shaft clip with pliers and pull up. This is from the manual, seems important  : The tilt lever should be held in the lock position until the steering column shaft is installed to the vehicle. If the steering column is removed with the tilt lever released, or the tilt lever is released after the steering column shaft was removed from the vehicle, the steering column cannot be reinstalled correctly. If the steering column is installed incorrectly, the collision energy absorbing mechanism may be damaged. : The tilt lever should be held in the lock position until the steering column shaft is installed to the vehicle. If the steering column is removed with the tilt lever released, or the tilt lever is released after the steering column shaft was removed from the vehicle, the steering column cannot be reinstalled correctly. If the steering column is installed incorrectly, the collision energy absorbing mechanism may be damaged.


- I have removed the ignition lock too, mainly because initially I want to use the whole column, but I think you can skip this part. There are 2 bolts here, I did a cut with a Dremel tool and unscrew them easily.
- The most important part of this post is to describe how to swap the shaft, I’ve search online and I didn’t find much, so here’s how I did it. To do this you will need a bearing puller set, I’ve used Yato YT-06412. To remove the shaft with the puller is quite simple just connect the puller as in photo. Make sure you unlock the ignition, by turning the key. Do not forget to remove the c clip that secures the shaft, first!

- Now that you have the shaft removed, is a good time to apply new grease to bearings.
- To install the shaft back in, was the real challenge. I’ve tried different strategies like hammering, but this is hard to do because the bearing from top is quite narrow and the shaft needs a lot of force to go in. I’ve bought a long screw (M5x80mm) that I’ve put inside the column, then I’ve connected the puller as in photo and secure the screw at the end with some washers and a nut. Now in order to pull the shaft up, slowly undo the 2 bolts of the puller. Undo the bolts only halfway, screw all back in and repeat this until you pull up the shaft completely and you can reinstall the c clip. This works perfectly and you don’t have to worry about damage something. Make sure you buy some additional screws and nuts, as these may fail and need replace to finish the job.


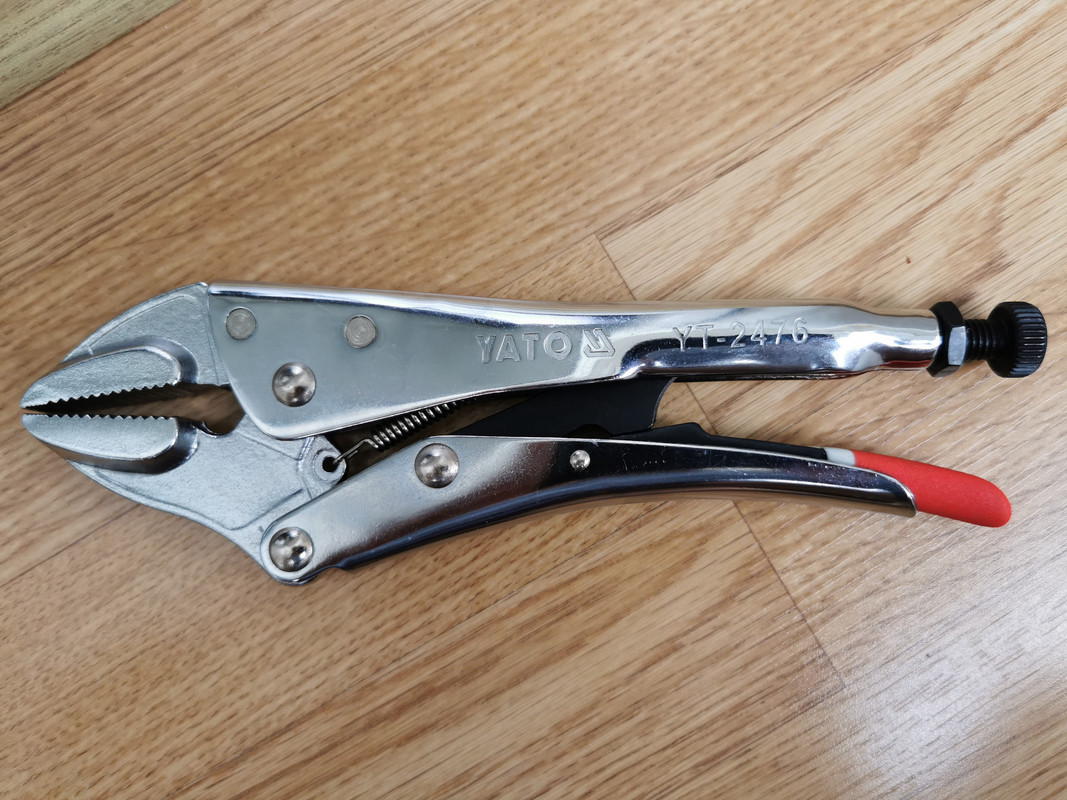
- Reinstall all back, the biggest issue is to put the column back, you have to pinch the steering column shaft clip with pliers and put it back in the lower shaft, I strongly advise that you have somebody to help you with the column or, if you work alone, you could use something like in this photo. To pinch the column clip, I’ve found this type of plier works best, Yato YT-2476 in photo.

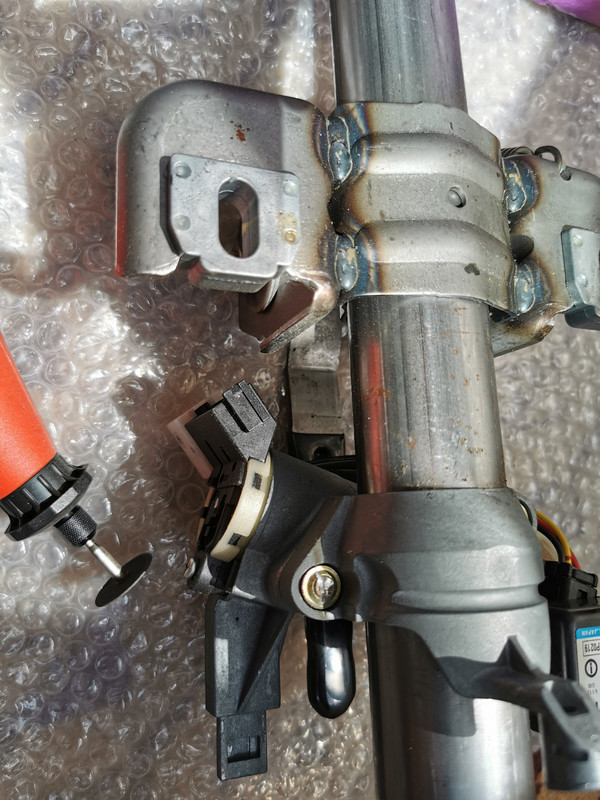
- and finally you'll have to make a small adaptation for the horn to work, as the connectors are different:


Good luck with your install, the final result definitely worth the effort:
before:
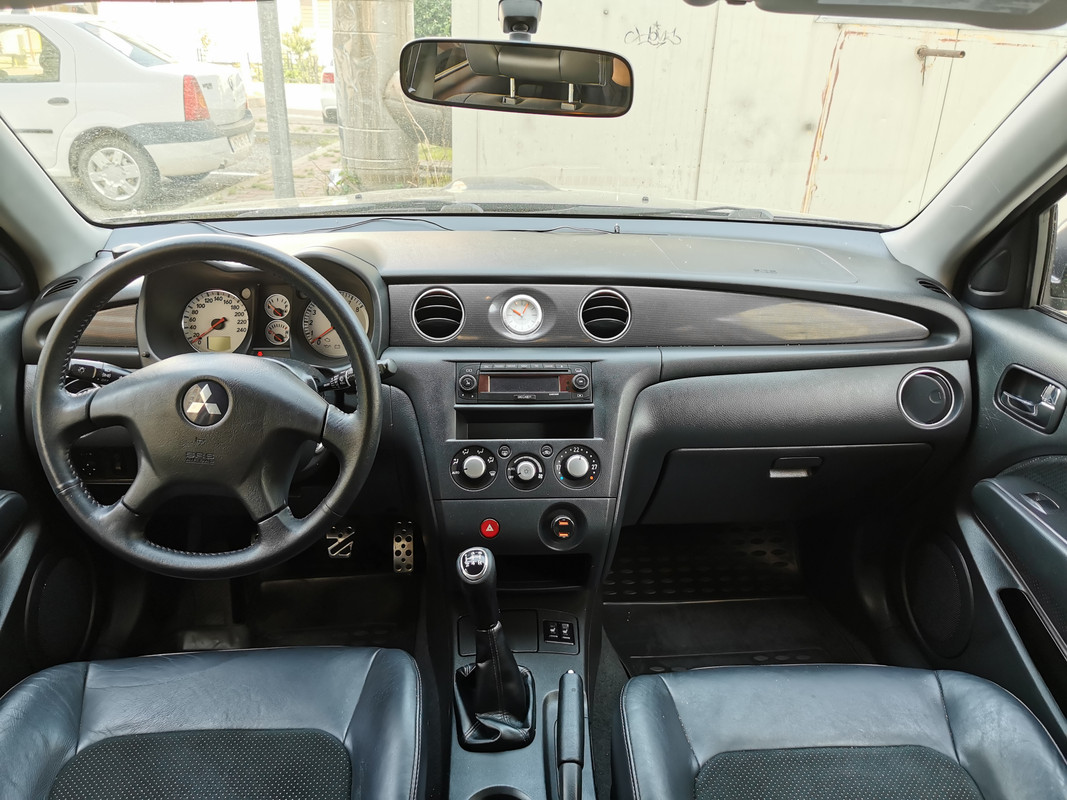
after:


 |
|
 |
|
 |
DAMON
Forumowicz
Auto: OT1
Kraj/Country: Polska
Dołączył: 23 Kwi 2019
Posty: 36
Skąd: Lublin
|
| Wysłany: 04-08-2022, 08:43
|
|
|
Very good job and documentation, looks great ") |
|
 |
|
|
best_x_treme
Forumowicz
best_x_treme
Auto: O1T
Kraj/Country: Polska
Dołączył: 22 Kwi 2021
Posty: 64
Skąd: Piatra Neamt / Romania
|
| Wysłany: 04-08-2022, 09:31
|
|
|
Thanks, hope it will be helpful. Feel free to add your thoughts or complete what I've missed
| DAMON napisał/a: | | Very good job and documentation, looks great |
|
|
|
|
|
|
ciuciekk
Nowy Forumowicz
Auto: Outlander Turbo
Kraj/Country: Polska
Dołączył: 14 Kwi 2015
Posty: 19
Skąd: Stara Wieś
|
| Wysłany: 15-08-2022, 20:20 Kierownica Outlander
|
|
|
Witam wszystkich.
Nie znalazłem podobnego tematu więc zakładam nowy.
Czy do Outlandera 1 gen pasuje jakaś kierownica P&P? np. z Colta lub innych.
Bo z kierownicą Evo jest trochę zabawy ,a ori troszkę odstrasza. |
|
|
|
|
|
Bzyk_R1
Mitsumaniak
Outlanderowiec

Auto: O1T LSRG, RX450H
Kraj/Country: Polska
Pomógł: 132 razy
Dołączył: 02 Sie 2016
Posty: 5399
Skąd: Pińczów TPI
|
|
|
|
|
|
tościk
Forumowicz

Auto: '20 Yukio 1.2T
Kraj/Country: Polska
Pomógł: 9 razy
Dołączył: 06 Gru 2017
Posty: 636
Skąd: z nienacka
|
| Wysłany: 16-08-2022, 13:11
|
|
|
| ciuciekk napisał/a: | Nie znalazłem podobnego tematu więc zakładam nowy.
Czy do Outlandera 1 gen pasuje jakaś kierownica P&P? np. z Colta lub innych. |
| Cytat: | | Nie znalazłeś piszesz, hmm... |
Bzyk_R1, no tak prawdę mówiąc, to tak jak kolega ciuciekk napisał, jeśli chodzi o momo, to P&P to nie jest ") |
|
|
|
|
|
Bzyk_R1
Mitsumaniak
Outlanderowiec
Auto: O1T LSRG, RX450H
Kraj/Country: Polska
Pomógł: 132 razy
Dołączył: 02 Sie 2016
Posty: 5399
Skąd: Pińczów TPI
|
| Wysłany: 16-08-2022, 20:31
|
|
|
tościk, Tobie nie trzeba chyba powtarzać że nic w tym aucie nie modzi się P&P. Autor posta szukał podobnego tematu dotyczącego zmiany kierownicy no to mu pomogłem znaleźć.
Kierownice które jeszcze mogą pasować to te od Lancera VII (nie momo) oraz ta od Colta. Nie montowałem jednak takich i nie wiem ile z tym zabawy, wiem że parę Outlanderów z taką kierą jeździ. |
_________________
Gdy obowiązek wezwie mnie,
Tam wszędzie, gdzie się pali,
Ty mi, o Panie, siłę daj,
Bym życie ludzkie ocalił.
Lekki Samochód Ratowniczo Gaśniczy: 300+KM/500+Nm http://forum.mitsumaniaki...1489343#1489343 ターボアウトランダー
Legenda we własnym garażu: http://forum.mitsumaniaki...1502384#1502384
Sprzątam i pilnuję porządku w dziale Outlandera. Czasem zdarza mi się kogoś wycinać...
ZAPRASZAM DO ODWIEDZENIA I SUBSKRYPCJI MOJEGO KANAŁU NA YT
https://www.youtube.com/c...sgoaAdLHmEnzUrg A czy Ty Gość już subskrybujesz?
STOP HYBRID GO LPG ----> STOP SMOG GO HYBRID |
|
|
|
|
|
best_x_treme
Forumowicz
best_x_treme
Auto: O1T
Kraj/Country: Polska
Dołączył: 22 Kwi 2021
Posty: 64
Skąd: Piatra Neamt / Romania
|
| Wysłany: 17-08-2022, 09:16
|
|
|
| Changing the inner shaft is P&P, so I think it is correct to say that changing to MOMO is P&P. For all this, you just need an inner shaft and a MOMO, that's it, no cutting or anything. |
|
|
|
|
|
|
|
|